

Product Description:
Hawks Motorsports is pleased to offer our clients the following.
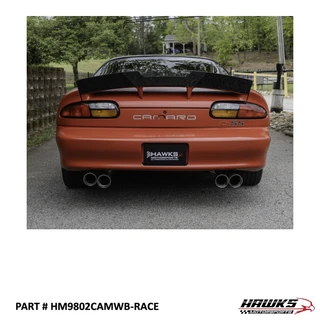
Add approximately 1 inch of height to the compatible factory spoiler on your 1998-2002 Chevrolet Camaro SS with this Street wickerbill spoiler extension. The extension is made from gloss black abs plastic and mounts along the existing spoiler’s trailing edge. Mounting hardware is supplied as specified below.

| Feature | Specification |
|---|---|
| Brand / part number | Hawks Motorsports / HM9802CAMWB-STREET |
| Application | 1998-2002 Chevrolet Camaro SS |
| Version / height added | Street / approximately 1 inch |
| Material / finish | Gloss black ABS plastic |
| Published thickness | 0.185 inch |
| Required mounting profile | Factory Camaro SS rear spoiler |
| Mounting hardware | Titanium mounting hardware; select Black, Silver or Gold |
| Condition / quantity | New aftermarket spoiler extension; one extension package |
| Surface protection | Removable protective film |
| Installation tool | Optional add-on; select whether to include |

| Year | Make and model | Required spoiler / selection |
|---|---|---|
| 1998 | Chevrolet Camaro SS | Factory Camaro SS rear spoiler |
| 1999 | Chevrolet Camaro SS | Factory Camaro SS rear spoiler |
| 2000 | Chevrolet Camaro SS | Factory Camaro SS rear spoiler |
| 2001 | Chevrolet Camaro SS | Factory Camaro SS rear spoiler |
| 2002 | Chevrolet Camaro SS | Factory Camaro SS rear spoiler |
Fitment note: Match the factory SS spoiler profile before ordering; Camaro model year alone does not establish spoiler compatibility. Inspect the actual spoiler and brake-light arrangement on cars with replacement or modified parts.

- One Street wickerbill spoiler extension with removable protective film
- Titanium mounting hardware; select Black, Silver or Gold
Order selections: Add the Riv-Nut installation tool only when that option is selected.

This Street version extends the rear spoiler vertically by approximately 1 inch, changing the trailing-edge profile and appearance. It is an add-on for the specified existing spoiler. Lower Street profile for the factory SS spoiler.
The protective film helps prevent handling marks during trial fitting and installation. Keep it in place through mounting work and cleanup, then remove it before final assembly as directed in the guide.

Read the shared illustrated installation guide before drilling. It shows a Firebird example and states that the same installation steps apply across platforms. Match the actual extension, spoiler and mounting hardware before marking holes.
Open Installation PDF in a New Window
The PDF opens separately from this product page; your browser controls whether it uses a new tab or window.
- Protect the spoiler finish with painter’s tape and trial-fit the extension. Check its alignment and any third-brake-light opening before marking the first hole.
- Mark and drill one mounting position at a time. Check the required hole size against the selected inserts and the guide before enlarging the hole.
- For the recommended Riv-Nut method, use the correct adapter and seat each insert in the drilled spoiler. Temporarily secure the extension before locating the next mounting position.
- Repeat the alignment, drilling and fastening sequence for the remaining positions. Clean away drilling debris before removing the protective film.
- Complete the final installation with the fasteners snug. Avoid excessive force: the guide warns that overtightening can spin the Riv-Nut and damage the spoiler.

How tall is the Street profile?
It adds approximately 1 inch above the factory Camaro SS spoiler. The corresponding Race version has a taller 3-inch profile.
Does this replace the complete rear spoiler?
It is a wickerbill extension that mounts to the existing compatible Camaro SS spoiler.
What is the extension made from?
The panel is 0.185-inch gloss black ABS plastic with a removable protective film.
Are hardware color choices available?
Yes. Choose Black, Silver or Gold titanium mounting hardware when ordering.
Is the installation tool a separate option?
Yes. Select the tool option if needed. The PDF covers the recommended Riv-Nut installation method and drilling procedure.